Pages

Tuesday, November 13, 2012

Homemade Pancake Mix


I really don't know how I got so lucky.  My husband spoils me so.  He knows when I've had a rough day and/or week, and before I even have a chance to argue and say that I have too much to do to take a break, he has already ran me a bath, either set the book I'm reading out or set up a movie, is pouring me a glass of wine, and is making me a plate of cheese and crackers.  Thirty minutes later he is bringing me chocolate and checking to see if I need anything else. 

I'm probably most recently spoiled by my husband on Saturday mornings.  He'd set his alarm to get up extra early (usually around 4:30am) and I'm woken up an hour later with a kiss on the cheek.  Coffee is made, he pulls out a heaping plate of blueberry and chocolate chip pancakes that are being warmed in the oven, and serves it all with an egg cooked just the way I like it.  Such a great start to the day!  Makes getting up that early for an 100 mile bike ride worth it.  Oh, and did I mention that he went on the rides with me so that he can make sure my training goes well?  He wasn't even training. 

This past weekend we traveled to Panama City with another couple for the Ironman.  I ended up doing much better than I ever imagined I'd do, and I'm pretty sure it had a lot to do with this:


My husband woke up at 3 am to make us pancakes before our race.


I like to think I do my part to help out on Saturday mornings by always making sure we have enough pancake mix to make pancakes. When you get up that early it makes sense that you don't want to spend too much time measuring out different ingredients to make homemade pancakes. When Raymond and I first got married we found a pancake mix that I could live with (I don't like box mixes...they give me the heebie-jeebies) and actually enjoyed. It was a multi-grain pancake mix that tasted nutty and nutritious enough to make me forget all the additional additives that were probably in it. Unfortunately, as it always seems to happen, they discontinued that mix. Therefore to keep from going back to a box mix, I set my sights on coming up with a multi-grain pancake mix that tasted just as good without any additives.

For this mix I started out just buying a bunch of different grained flours and such that I had wanted to try.  In the process of this, I discovered my love for coconut flour.  Besides the fact that it smells AMAZING, coconut flour is actually really good for you.  It is gluten free, high in fiber, and high in protein.  It is also a good source of lauric acid (supports the immune system and thyroid) and manganese (bone health, nervous system function, thyroid health, and moderates blood sugar and insulin levels).

I know this is a long ingredient list, and may look a little intimidating, but if you want to substitute whole wheat flour for one of the other flours listed, go for it.  If you substitute the coconut flour you will need to reduce the number of eggs and the amount of water you add to the final mix.

Ingredients:
 
2 cups whole wheat flour
2 cups ground oats
1 1/2 cups pumpernickel flour (whole rye flour)
1 1/2 cup buckwheat flour
1 1/2 cups brown rice flour
1 1/2 cups coconut flour
1 1/2 cup powdered buttermilk
1 cup brown sugar
3/4 cup brown flax seeds
3/4 cup seasame seeds
1/2 cup cornmeal
1/2 cup wheat germ
1/2 cup wheat bran
1/2 cup ground almonds
1/4 cup ground flax
1/4 cup chia seeds
5 Tbs baking powder
2 Tbs cinnamon
1 Tbs baking soda
1 Tbs salt

Directions:

This part is really easy....just mix all ingredients and store in an air tight container or ziplock bag.  It helps to start with the brown sugar because that's the most clumpy of the ingredients, and starting with that ensure that it all breaks up by the time you add everything.

To make the pancakes:

Combine 1 1/2 cups mix with 2 eggs, 2 TBS vanilla, 1-2 TBS of butter or oil, 1 cup of water, and 1 cup of optional mix-ins (blueberries, chocolate chips, nuts, etc.).  Let sit for 10-15 min while you heat up your griddle, and then cook and enjoy!


"Every woman should get herself two things: a good husband and a good set of knives.  Bad husbands aren't worth the trouble, and cheap knives aren't worth the purchase." ~ Kathleen Flinn from The Sharper Your Knive, the Less you Cry

I am lucky enough to get a fantastic husband who then made sure we got a great set of knives.  Oh how I love him!


Raymond was sitting beside me as I put this post together and happened to notice the picture of him making pancakes.  He asked me to remove it because he thought it would look like he was up drinking until 4 and then got the munchies.  Because I love the photo, I thought I'd just add a clarification that I snapped that with my phone after he woke me up as he was finishing making my breakfast. :)

Thursday, October 25, 2012

Mustard Salmon Packets


Last week we had a good friend come over for dinner.  Unfortunately she was only in town for a brief period of time and had a really packed schedule.  She needed to eat dinner at 6 pm on Monday night!  Wow, when you work until 5 or 5:30 most days and traffic is as unpredictable as it can get, that's a little stressful to think about.  I decided that we would have salmon because it wouldn't take that long to cook.  Plus I've had an idea for a while now about how I wanted to cook some salmon.  This ended up coming together quickly, and dinner was ready at 6:10pm.  That's pretty good considering my past history.  (Just ask my husband, he'll tell you that my cooking has taught him patience...or maybe tested his patience) :)

During our canning adventure we made close to 40 jars of this lovely banana pepper mustard that we have been using on our homemade sandwiches since October Unprocessed started.  I used this mustard to make the salmon packets, but feel free to use whatever mustard you have on hand.  Dijon mustard would be wonderful as well. (It's really easy to make your own mustard for October Unprocessed.  Just get some mustard seeds, soak in some vinegar and white wine, let sit for 24 hrs, then blend until desired consistency is reached.)

Ingredients:

4 4-6oz salmon fillets
1/4 cup mustard of choice
1 medium tomato
1/4 cup onion
2 TBS fresh herbs (I used a mix of basil and parsley)
1 TBS good balsamic vinegar
Salt & Pepper to taste

Directions:

Pre-heat oven to 400 degree's Fahrenheit. 

Combine the tomato, onion, herbs, balsamic vinegar, salt, and pepper, and let sit for about 10 minutes.


Tear off four medium size pieces of foil and place each fillet on a piece of foil.  Spread about 1 Tbs of mustard on each fillet and let sit for 5 minutes.


Divide the tomato mixture evenly onto of each salmon fillet. 


Fold up the sides of the foil to create a packet. Don't close the foil onto the salmon, but leave some room for the steam in the packet.


Place the foil packets into an oven safe dish and bake for 15-20 minutes.  Let rest for 5 minutes after removing from oven.

Enjoy!


Wednesday, October 17, 2012

Pot Roast (Crock Pot)


So typically my pot roast recipe is a hit and super easy.  I set out to make it one morning...unprocessed.  Typically I use a Lipton onion soup packet as my seasoning mix and I am good to go.  Since we are participating in October Unprocessed I knew that this method would be out of the question, but I decided to looked up the ingredients in the soup packet and was appalled!  There were sooo many more ingredients that I didn't recognize than ones I did.  I first set out to make a version of the seasoning mix but soon realized all the imitation versions used a beef bullion.  I'm currently running really low on stock and I've yet to try make beef stock, so I decided to use some dried porcini mushrooms and a bay leaf as a flavorful substitute. 

Ingredients:
 
1 large beef chuck roast
1 lb Yukon or russet potatoes, washed and cubed
1 lb sweet potatoes, washed and cubed
1 lb carrots, washed, peeled, and cut
1 medium onion
2 cloves garlic, sliced
1 bay leaf
1 1/4 cup wine
1 1/4 cup water
1-2 TBS oil
Salt & Pepper

Seasoning Mix:
1 oz dried porccini mushrooms
1/4 cup dried minced onion
2 tbs chives
1/2 tsp parsley flakes
1/2 tsp paprika
1/2 tsp celery seed
1/2 tsp salt
1/4 tsp pepper
 
Directions:

Heat the oil in a large pan on medium to high heat.

Grind the porcini mushrooms into a powder and mix with the rest of the spices.


Cube the potatoes and carrots and place in the bottom of your slow cooker. 


Sprinkle half of the spice mix on top of the potatoes and carrots


Generously salt and pepper the chuck roast and then brown on all sides in the oil.


Place the chuck roast in the slow cooker on top of the veggies.

Spread the sliced garlic over the top of the chuck roast.

Sprinkle the rest of the seasoning mix on top of the chuck roast.

Top with the onion and bay leaf.


Pour in the wine and water.

Cover and cook on low for 8 hours or until done.


Lesson Learned - Hammers do NOT belong in the kitchen.  Notice the wrench underneath the crockpot in the above picture?  Well, one day Raymond was having trouble with a rubber piece of the footing that came off of the crockpot, and in his frustration grabbed a hammer to see what he could do.  Fortunately the crockpot still cooks fine, but we have to use the wrench to keep it from falling over.  :)


Come home to a wonderful smelling dinner and enjoy!

Tuesday, September 25, 2012

October Unprocessed

Have you heard of October Unprocessed?  It's a challenge to eat only unprocessed foods the entire month of October.  The main goal of this challenge is to lessen everyone's dependence on highly processed foods and prove that eating whole foods is not only tastier, but is better for you as well.  The more time I spend in the kitchen the more I am disgusted by processed foods.  Some things are just so easy to make, require ingredients that you probably have anyway, and yet the majority of our society still reaches for the box.  This year Raymond and I have decided to participate in October Unprocessed.  It's still a week out and thus far almost 3000 people have signed the pledge! 

You can find more information about October Unprocessed and sign the pledge yourself here.  As a summary, according to the rules of the challenge, if something passes the "kitchen test" it is unprocessed.  The "kitchen test" states that "unprocessed food is any food that could be made by a person with reasonable skill in a home kitchen with whole-food ingredients."  Whooh, that takes a bit of stress off!  You don't have to make everything from scratch, but you do need to choose items that are made with whole ingredients.  Luckily for us beer, wine, cheese, olive oil, and vinegar all pass that test.  What else would we use to calm down when we're stressed about not having time for anything because we're spending all month cooking in the kitchen?  :)

In all seriousness though, I'm not for-seeing it being that bad.  I'm a little nervous of becoming overwhelmed, but Raymond and I don't eat too many processed foods anyway.  We haven't discussed all the technicalities and where we will decide to draw the line, but I'm pretty sure we will still drink milk, and coffee, we will still need to use our protein and carbohydrate powders for training, and we will use vital wheat gluten for whole grain bread.  Other than that I'm excited about making lots of homemade butter, bread, crackers, and anything else we come across.  We've been slowly preparing and trying to stock our pantry and freezer for the challenge.  We've made breakfast sandwiches, re-fried beans that will get made into bean burritos this week, and we had a canning weekend where we canned salsa, roasted red pepper spread, and mustard's. 


We may or may not have had problems with our make-shift caner in the form of a big stockpot and strainer.  ;-)


I'm a little sad I didn't get a chance to can any tomatoes, as grabbing a can of tomatoes from the pantry is probably my biggest processed short cut, but we will work it out. 

In the month of October I will especially try to keep up with my posts with unprocessed meals and snacks.  I'm sure we will make some slip ups, mainly in the form of birthday parties, weddings, but that's okay.  The main focus of the month will stay in tact.  Clean eating.  Won't you join us for October Unprocessed?  Sign the pledge here.


Friday, September 14, 2012

Zucchini Fritters


I am such a child.  I like to reward myself for jobs well done.  That's exactly what these were.

Recently we went to Maine for a race.  I had the worst swim I've ever had.  They say you can't win a triathlon by the swim, but you can loose a triathlon in the swim.  I think it's pretty evident that's what I did.  I was in 18th place after the swim, in 7 place after the bike, and then fell back into 9th place by the end.  I was actually really happy with my run as I had been fighting and injury so I didn't expect to be able to run the whole race and turned out I was.  Needless to say, I decided it was time to start swimming...especially since my Ironman is less than two months away!! 

Last night I finally joined a gym.  I jumped in the pool and immediately felt like a rock star as I was consistently passing the guy in my lane about three times to his one lap.  Unfortunately my ego was only high for about 10 minutes before he got out and this other guy got in and started lapping me like he was Michael Phelps.  The only problem is, he wasn't Michael Phelps...I'm pretty sure he wasn't even close.  Geeze I need to swim more!  He ended up getting in the next lane when it opened up about 20 minutes later and this large guy got in my lane after him and ended up kicking me right away.  I decided 40 minutes in the pool was enough abuse for the first time in months.  Like I said, you surely can't win a triathlon in the swim.  :)

I got home and this was my reward to myself.  It was a Pintrest find.  I of course couldn't leave well enough alone and changed it up just a bit.  I'm not going to say I was absolutely thrilled with the results, but I think if I would have cooked the ingredients all a bit more before browning them they would be great.  The method of cooking by dropping them directly on the skillet doesn't cook them long enough and I can taste the raw flour, and cooking it a bit before-hand would also help to distribute the feta more evenly.  Below I have written the recipe with the changes I think need to be made.

Ingredients:

1 3/4 cups zucchini (about 2 medium), shredded and squeezed to remove excess moisture
1/2 red bell pepper, shredded and squeezed to remove excess moisture
1 clove garlic, minced
2 green onions, chopped
1/2 cup whole wheat flour
1/4 cup feta
1/4 cup parsley
1 egg
1/4 tsp salt
1/8 tsp pepper
1 Tbs Oil

Directions:

Heat oil in a cast iron pan.

Mix all the ingredients except for the oil.


Cook the mixture on low heat in a medium saucepan for about 3-5 minutes.  Taste and add additional salt and pepper if necessary.

Spoon about two tablespoons of the mixture onto pan.


Cook until brown, about 4-5 minutes each side.

 
Enjoy!  I didn't make any last night, but I imagine this would go very well with some Roasted Red Pepper Tzatziki, or just some regular Tzatziki.

Wednesday, August 22, 2012

Blue Cheese Burger with a Whiskey Cherry Sauce


I'm not sure if I'll be able to eat a burger with lettuce, tomatoes, and pickles again without missing this one.  Last week my husband had a craving for burgers.  I had gone to Central Market this year for grill week and tried a burger that had a grilled peach on it.  I loved it and immediately made a note to try this the next time we have burgers.  As I was getting out all the typical burger condiments, I realized we had some leftover cherry sauce that I had made to go on top of pork chops earlier that week, lavender mustard I had brought back from Paris a while ago, spinach that was starting to look droopy, and some leftover blue cheese from a wine and cheese party I hosted for my girlfriends.  Thus, the perfect burger was born!! 

Immediately after my first bite I had to text two of my friends right away to tell them how wonderful it was and beg them to make something similar SOON!  Below is how I made my burger.  Of course my husband ended up topping his burger with and egg and wouldn't come near mine with the blue cheese, so the amounts listed below are for 1 burger, except the cherry sauce (which would probably be good for about 4 burgers).  The burger ended up being opened faced because I wasn't terribly hungry, and we were out of hamburger buns so I made it on some whole grain bread we had.  I'm not sure if this would be a good pick up and eat burger anyway, so it worked out well. 

Ingredients:
 
Burger:
Ground beef, formed into patties
whole grain bread, toasted
lavender mustard, or some other kind of good mustard
2 cups spinach
1/2 peach, sliced
blue cheese
 
Whiskey Cherry Sauce:
1 tsp oil
1 shallot
1 cup cherries, pitted
1/4 cup whiskey
1 tsp fresh thyme leaves
1/2 tsp dry mustard
1 Tbs red wine vinegar
1 1/2 Tbs honey
4 Tbs water, divided
1 tsp cornstarch
salt & pepper


Directions:

Whiskey Cherry Sauce:

In a small sauce pan heat oil over medium heat and saute shallot until soft. 

Add the cherries, whiskey, vinegar, mustard, thyme, honey, 2 Tbs water, and a pinch of salt. 

Bring to a simmer and cook 15 minutes, slightly mashing the cherries a bit with a spoon. 

Separately make a slurry with the cornstarch and water and add to the cherry mixture and stir constantly until thickened.

Burger:

Grill your burgers to the doneness that you like.

Slice your peach and grill for 3-4 min per side.

Add about 1/4 of the cherry sauce, and 2 cups of spinach to a saute pan and saute until the spinach is wilted.

When the burger is almost done, I like to top it with the blue cheese before I take it off the grill so the cheese gets a little melty.  Then I top it with the grilled peach slices before placing it on a toasted slice of bread with the lavender mustard (or any other type of mustard you prefer)

Finish the burger off with the spinach and cherry sauce saute and get ready for pure bliss!


Even though I am not a huge meat/burger person, I think we will be having burgers again sometime very soon so I can make this again.  :)

Please excuse the quality of the pictures.  Someone (being myself) had all the camera's elsewhere as I made this burger so I grabbed my husband's Iphone and made do.  :)


Friday, August 10, 2012

The BEST chocolate cake ever!

Last weekend was a family filled weekend.  On Saturday, my newest nephew was baptised and I got to make a cake for that celebration. 


After the baptism, I got to watch my niece get soo excited about eating broccoli.  She is only nine months old and rejected the broccoli that had cheese sauce on it, and loved the plane broccoli!!!!!!!  Her parents are obviously teaching her good eating habits. :-)


On Sunday we had a book signing party for my grandmother and I got to make a cake for it.  My aunt has worked tirelessly for the past 4 or 5 YEARS writing up my grandmother's memoirs, finally finished, and had them put into a book. 


My grandmother is definitely someone who I think if we grew up together we would be inseparable.  She is hilarious!  She enjoys movies like "Dumb and Dumber", and "Legally Blonde". She taught me how to play London bridges, backgammon, and bake bread.  When my parents went out of town, we would get to spend the weekend at her house, I would get to sleep in this huge room with a California King size bed, and thick curtains that didn't let an ounce of light in.  My grandparents would let me sleep in as long as I wanted, and then when I got up, my grandpa would always treat us to donuts for breakfast from the local bakery.  I spent a lot of time at my grandparents house growing up, especially when we moved to the country and they lived in town.  I would go to their house after school in between all my extra-curricular activities.  Teaching my grandmother the new slang was ALWAYS entertaining.  I remember one time I was whining to her about going to work and having this one annoying guy hit on me.  She was absolutely appalled and told me that I should punch him back!  She thought he was literally hitting me!
This cake has appeared in many forms. If I ever have an occasion where a chocolate cake is requested this is the one I make.  The first time I made this was for my cousin's birthday years ago. 


Her father, lets just call him uncle chef, complimented me on it, so I knew I had a winner. 

Over the years, every time I make it, it never lets me down.  It's graced many birthday tables:


A baby shower:


...and most recently, my grandmothers book signing:


For the occasion, I chose the most solid recipe I have. It is the Hershey's chocolate cake recipe that I have only very slightly modified to make my own. The first couple of times I made it, I thought I had messed it up, but it ends up turning out perfectly moist every single time! 

Ingredients:

2 cups sugar
1 3/4 cups flour
3/4 cups cocoa
1 1/2 tsp baking powder
1 1/2 tsp baking soda
1 tsp salt
2 eggs
1 cup milk
1/2 cup oil
2 teaspoons vanilla extract
1 cup boiling water
1 tsp instant coffee

Directions:

Preheat oven to 350-F.  Line two 9-inch round baking pans with parchment paper and then grease and flour them.

Mix all the dry ingredients except for the instant coffee.

Add the eggs, milk, and oil to the dry ingredients and beat for about 2 minutes.

Separately add instant coffee to the boiling water.  Mix the boiling water into the rest of the batter.  (Note that the batter will be really thin.)

Pour batter into prepared cake pans.


Bake 30 to 35 minutes until done.  Cool 10 minutes in pan, and then place on wire racks.  Once cakes are completely cool, ice them and enjoy.  Though I want to throw out the fact that this cake is moist enough that it's just as tasting with no icing and some powdered sugar sprinkled over it for presentation.

Once you try this cake you will understand why I have no desire to try making any other chocolate cake recipes. It is so easy to put together and it comes out perfect EVERY time!


Happy Baking!

Amanda's Tips:
Most recipes tell you to bake cakes until the toothpick comes out clean.  Though that's a way to make sure the cake is done, the problem with that is it usually means it's slightly overdone.  The cake will continue to cook just a bit once you pull it out of the oven, so it's best to pull it out when there is just a tad left on the toothpick. 


Wednesday, July 25, 2012

Grilled Beef Fajita Salad


I'm not a very good summer cook.  I love the abundance of fruits and vegetables in season, but somehow I always find myself turning on the oven to cook them.  With our work and training schedules I find myself assembling casseroles and such on Sunday night that can easily be thrown in the oven Monday after we get home from work and then we eat on the leftovers for a couple of days.  It works out well for us that way.  The only problem is that this involves turning on the oven every couple of days.  I saw the idea for grilling Romaine lettuce on one of my favorite blogs, and thought that this may be perfect for my first stove top grill this summer.  It was so easy to throw together that we ate this three nights in a row for dinner.  Leftovers made pretty good lunches as well.

Ingredients:

Salad:
2 hearts of romaine
1 flank steak
1 cup corn
1/4 cup onion, diced
1/4 bell pepper, diced
1 small tomato, diced
1/2 tsp salt
1/4 tsp pepper
1/2 Tbsp Olive oil

Dressing:
2 Tbsp Olive Oil
4 tsp red wine vinaigrette
1/2 tsp chipotle chili powder

Marinade:
1/2 cup onion, diced
4 garlic cloves, minced
1 jalapeno, minced
1 1/2 Tbs lime juice
1 cup beer
1/2 tsp salt
1 tsp pepper
1 1/4 tsp cumin
1 Tbsp soy sauce

Directions:

Mix all the ingredients for the marinade, put in a bag, and let marinade overnight.

Cut the tops and very carefully trim the bottoms off the romaine hearts making sure to keep enough of the bottom in tact to hold the leaves.  Cut the romaine hearts in half lengthwise.  Mix the ingredients for the dressing and brush all over the romaine halves. 

Meanwhile mix the corn, onion, and bell pepper with the salt and pepper.  Heat 1/2 Tbs Olive oil in a medium skillet, and add the mixture and saute until heated through, about 5-7 minutes.

Grill the steak for 4 to 6 minutes per side. Remove steak and let rest for 5 minutes. Slice thinly against the grain.

Grill all sides of the romaine hearts until just browned on all sides (about 3-4 minutes per side).

Top romaine hearts with corn mixture and sliced steak.  Garnish with cilantro and avocado.

Enjoy!


Tuesday, July 3, 2012

Stuffed Zucchini


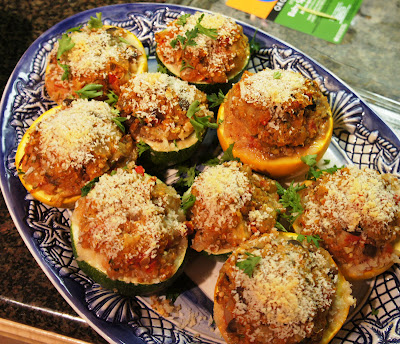
Recently Raymond's best friend moved from Dallas to Minnesota. We definitely miss hanging out with him, so when was back in town for a few of days to close out his house I excitedly told Raymond to invite him over for dinner one night. Little did it occur to me at the time that since we were out of town the first couple of days he was back, that would mean we were having him over for dinner the very next day as that was his last night in town. For those of you who don't know me that well, I like to have several days to think about the menu, change my mind several times, and go grocery shopping. This time I had the span of about 6 hours to go through this process. I had already planned on making an Italian flank steak and corn on the cob. That would be fine for just Raymond and I, but since his friend was coming over, I felt that I had to come up with something else to go along with dinner. Lucky for me one of my co-workers who is in a CSA and has had trouble keeping up with her produce brought some up to work to share that next day. She had a beautiful zucchini that I quickly snatched up. With that I decided to stuff it to round out our meal. I enjoyed it so much so that I bought some cute little 8 ball squash the next week at the farmers market to stuff for a dinner party that next weekend.

After searching through recipes trying to find ideas for stuffing the zucchini I became increasingly worried about the amount of filler ingredients that were being used. I saw one recipe with 3 cups of breadcrumbs and 2 cups of cheese! That definitely takes the healthy right out of that! I decided to sub out some of the breadcrumbs with quinoa, and use a stronger cheese so that I could use very little. The end result I thought was quite fantastic and the quinoa and eggplant provide enough protein that this could easily be served as a main dish along with a salad for a complete meal. Note this makes a TON of stuffing and can be halved.

Ingredients:
3-4 large zucchini or equivalent
1 medium onion, diced
4 cloves of garlic, minced
6oz diced mushrooms
1 diced red bell pepper
1 medium eggplant, diced
2 medium tomatoes, diced
2 Tbsp olive oil
3/4 cup quinoa, dried
1 1/2 cup chicken broth
2 eggs, lightly beaten
3 Tbs tomato paste
1/4 cup Parmesan cheese
1/2 cup fresh breadcrumbs
2 Tbsp fresh breadcrumbs
2 Tbsp Parmesan cheese
2 Tbs Parsley, plus more for garnish
2 Tbs Basil, plus more for garnish
Directions:

Preheat the oven to 425 degrees.

Dice the eggplant into 1/2” pieces and cover with salt.  Let sit in a colander for 30 min.

Slice the zucchini in half lengthwise. Use a spoon to scoop out the center down to about 1/2″ thickness, reserving the insides. Cut up the reserved zucchini it if it’s not too seedy. If it is, I recommend using another small zucchini for the filling (this is what I did) and cutting it into 1/2″ dice. Put the zucchini halves into a large baking dish.

Dice into 1/2″ pieces the onion, tomatoes, mushrooms, bell peppers. Mince the garlic.

Thoroughly rinse the eggplant.

Toss all of the vegetables, including the reserved zucchini, with the minced garlic, 2 Tbs of olive oil, and salt and pepper.

Spread on a baking sheet and roast until tender, about 15-20 minutes.

Meanwhile rinse the quinoa, bring 1.5 cups of chicken broth to a boil, add in quinoa, lower the heat, and allow to simmer for 15 minutes.  Fluff with a fork.

Remove the veggies from oven, reduce heat to 350, and allow to cool until you can touch it (we’re going to add in the egg next and you don’t want it to cook as soon as it touches the hot vegetables).

In a large bowl, mix together the quinoa and the vegetables. Mix in the beaten egg, ¼ cup Parmesan cheese, ½ cup breadcrumbs, 2 Tbsp. fresh basil, and 2 Tbsp. fresh parsley. Scoop it into the zucchini halves, mounding up the filling.  Top with a sprinkle of breadcrumbs

Cover with foil and seal the edges around the baking dish (this will keep it moist and help steam cook the zucchini). Bake for 45 minutes or until the zucchini is tender (but not mushy!). Remove the foil and turn the oven to broil. Sprinkle the top with grated Parmesan and place it under the broiler for a few minutes until lightly browned. Remove and garnish with more fresh basil.

Enjoy!

Monday, June 4, 2012

Turkey Primavera Risotto


I love risotto!  It's such a comfort food and always delicious.  I also enjoy making it.  Standing over the stove constantly stirring, watching the grains absorb the broth and puff up makes for very relaxing dinner preparation.  Especially with this dish, it stands on it's own for dinner; there's no rushing around the kitchen trying to do 20 things at once to ensure that everything is done at the same time.

A lot of my ideas come from conversations with others around me.  One day at work last week I was talking with a co-worker and she mentioned she had some barley that she wanted to make into a risotto but wondered if it was possible.  I told her it was and it was delicious and she should try it!  I mentioned to her that I had been wanting to make a primavera risotto and she said that she had made and asparagus risotto with some lemon and really enjoyed it.  I decided to go ahead and make my primavera risotto with barley and lemon.  I was a bit worried that the hearty barley would give the dish too much of a winter feel, but in the end, the lemon juice really brightened it up to make a perfect summer dish!

Ingredients:

2 Tbs butter
1 cup barley, rinsed
 1 cup white wine
2 cups turkey or chicken stock
1 medium onion, diced
4 cloves garlic, minced
6 oz mushrooms, washed and cubed
1 cup frozen peas
1/2 bunch asparagus, washed and trimmed
2 cups shredded turkey or chicken
1 lemon, juiced
2 Tbs lemon zest
4 Tbs fresh parsley
2 Tbs Parmesan cheese, shredded
Salt and pepper to taste

Directions:

Since risotto takes a bit to make I like to pour a glass of wine, get a few crackers and some nice cheese out.  Once you've poured yourself a glass and consumed a bit of Bree, goat, Gouda, or whatever your choice, turn on some fun music, and gather the rest of your ingredients.


Whoops, I forgot the peas! Oh well, at least I remembered the wine and cheese. :)

In a saucepan bring your broth and 2/3's of the asparagus to simmer.  Reserve the remaining asparagus for the risotto.  I like to use the stems and save the tops for the end because I think that makes for a nice presentation.


Let your broth simmer for about 10 minutes or until asparagus is soft.  With an immersion blender, puree the asparagus into the broth.  Alternatively you can transfer asparagus and broth to a blender.


Keep this mixture on low heat.

Heat 2 butter in a skillet on medium heat and saute your onions until soft, about 4-5 minutes.


Meanwhile in a separate skillet, saute mushrooms and asparagus until soft.  Depending on how thick your asparagus is, you may have to start your asparagus before your mushrooms.  Remove from heat when soft.


Add the barley to the onions and cook until most of the liquid is absorbed.  4-5 minutes.

Add garlic and cook about 3 minutes or until fragrant.

Add the white wine and cook, stirring constantly until the wine is absorbed.  Now is a good time to grab your wine and settle in.  You will be here for about 40-45 minutes.


When most of the liquid has been absorbed...(about 5 minutes)


Add the asparagus-broth mixture about a cup at a time.


 Stir constantly until most of the broth has been absorbed...


...then add another cup.


When the last of the broth has almost been absorbed, add the peas...


...the turkey...


...and then the rest of the veggies.


Stir to combine everything and add the parsley, lemon juice and zest, and Parmesan.  Add salt and pepper to taste.

Garnish with more parsley and Parmesan.

Enjoy!